TianLock plays well with the Restrict Content Pro plugin an awesome plugin that can transform your WordPress theme into a powerful paid content site. In order to do this, you will have to purchase the plugin from here: Restrict Content Pro
Restrict Content Settings:
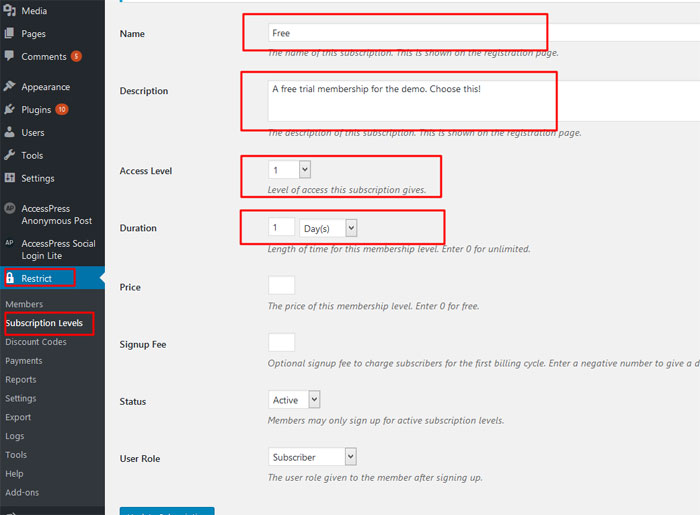
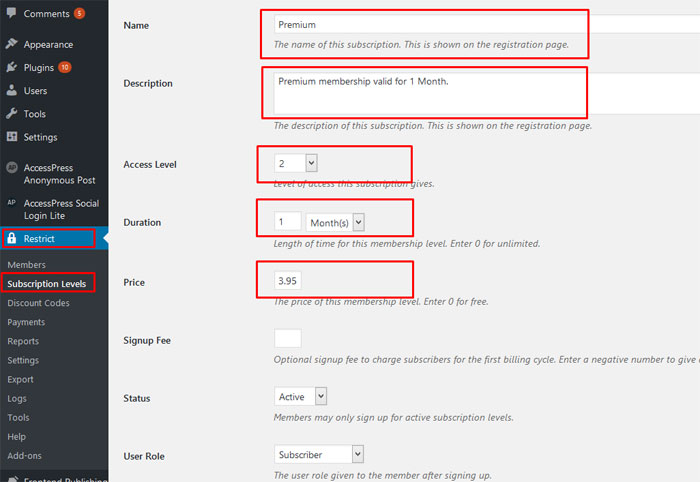
- First, create “Subscription Levels” In the demo, we’ve created 2 Subscription Levels, Free and Premium, go to Dashboard > Restrict > Subscription Levels:
- Go to Dashboard > Restrict > Settings > General: And add the same message to “Free Content Message” and “Premium Content Message”: In the editor change from Visual to Text and paste text:
<div class="boxsubscription">
<p style="text-align: center;">You must have an active subscription to view the content and the comments on this page. Please click the "Subcribe" button or the "Login" button if you already have an account.
<a class="btn_pink" href="https://anthemes.com/themes/tianlock/register/">Subscribe</a> <a class="btn_black" href="https://anthemes.com/themes/tianlock/login/">Login</a></p>
</div>
and change your links accordingly to your pages.
- Go to Dashboard > Restrict > Settings > Payments: Check each of the payment gateways you would like to enable. Configure the selected gateways accordingly.
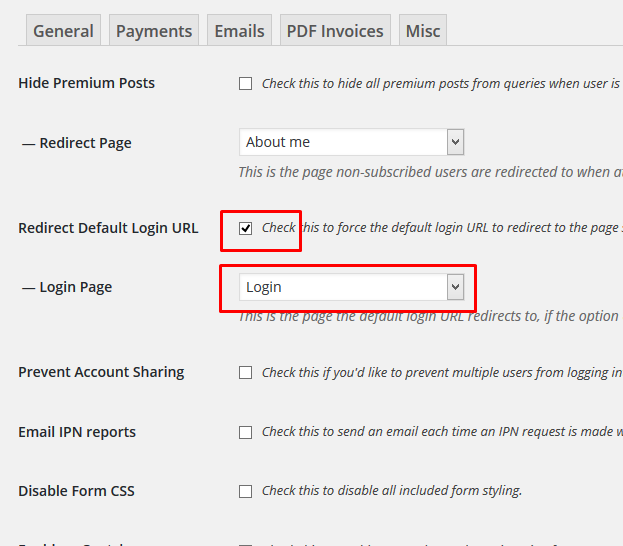
- Go to Dashboard > Restrict > Settings > Misc and Check the Redirect Default Login url and choose the Login page, like the image below and click “Save Options”.
Restrict Content – Custom Pages:
If you’ve installed the demo content, all the pages from the Restrict Content Pro will be added automatically, but if you don’t want to install the demo content, after the installation of the plugins, some pages will be created automatically like: Login / Register, etc. You can delete does pages and create them manually. For the pages created in the demo, follow the below steps:
- Login page. Go to Dashboard > Pages > Add New, name your new page “Login” and from “Page Attributes” choose “Template – Small Page 300px. Now change the editor to Text and paste this shortcodes:
[login_form]
[apsl-login-lite login_text='Social Connection']
- Register page. Go to Dashboard > Pages > Add New, name your new page “Register” and from “Page Attributes” choose “Template – Small Page 600px. Now change the editor to Text and paste this shortcode:
[register_form]
- Your Membership page. Go to Dashboard > Pages > Add New, name your new page “Your Membership” and from “Page Attributes” choose “Template – Default. Now change the editor to Text and paste this shortcode:
[subscription_details]
- Edit Your Profile page. Go to Dashboard > Pages > Add New, name your new page “Edit Your Profile” and from “Page Attributes” choose “Template – Default. Now change the editor to Text and paste this shortcode:
[rcp_profile_editor]
Premium Content – Restrict this entry to active paid users only.
Now for the fun part! Once you’ve set up the Restrict Content Pro functionality, you can easily restrict certain posts or pages, or even sections of content. To restrict content, simply check the Paid Only checkbox on the “Restrict this Content” meta box (located directly beneath your post/page editor). Go to Dashboard > Posts > Add New or Dashboard > Pages > Add New: