Frontend Publishing Pro Plugin. If you’ve installed the demo content with the 1 click install option, the pages/settings for Frontend Publishing Pro will be added automatically.
Follow this tutorial for installation of demo content in 2 minutes: https://www.youtube.com/watch?v=b94pQPAOths
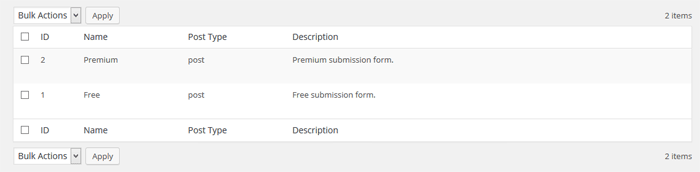
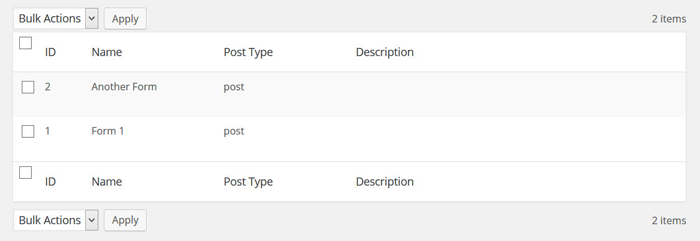
Now, in order to change the forms, go to Dashboard > Frontend Publishing Pro > Forms and you’ll see 2 forms created: Free and Premium:
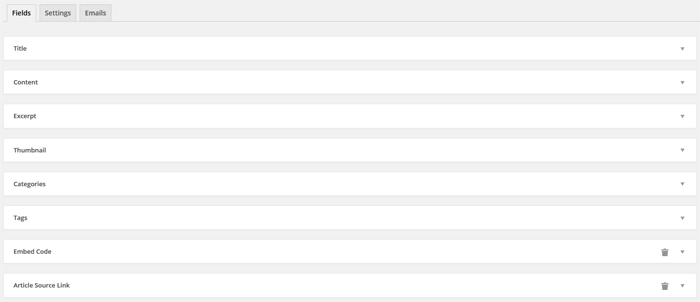
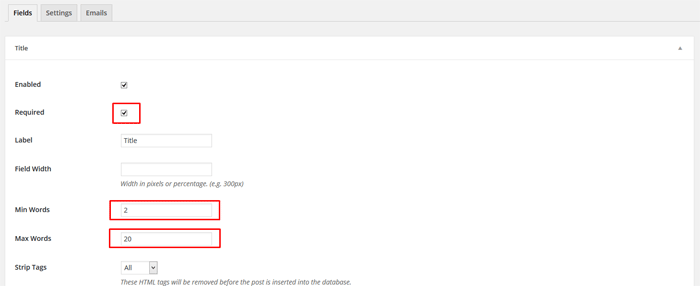
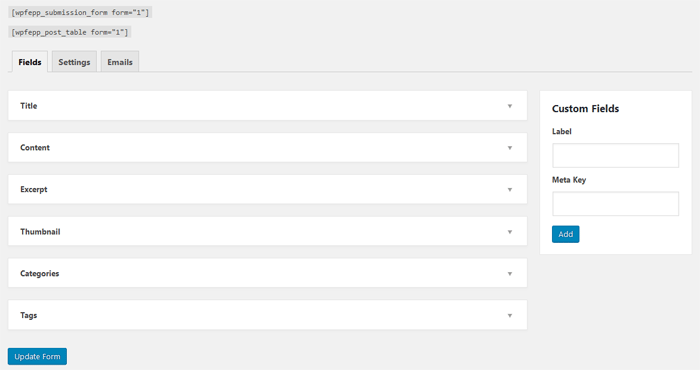
Now, click the Edit link from the Premium form and you’ll see the Fields:
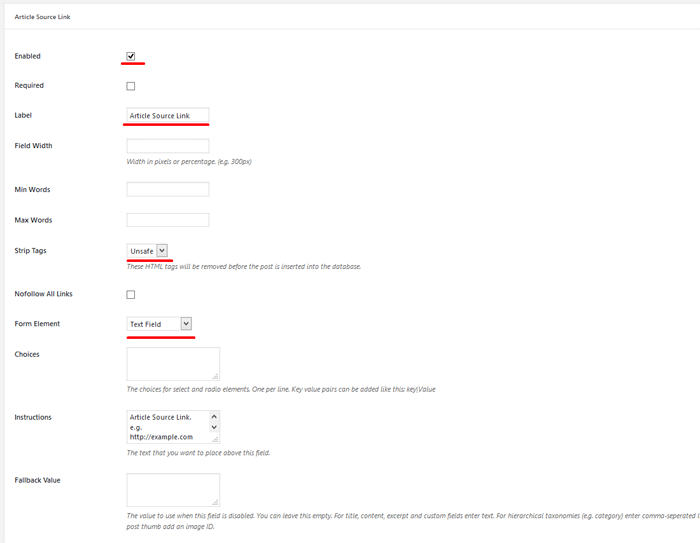
If you click on of the field, you’ll be able to define restrictions such as word range, maximum links, number of comma separated sections and so on:
Frontend Publishing Pro
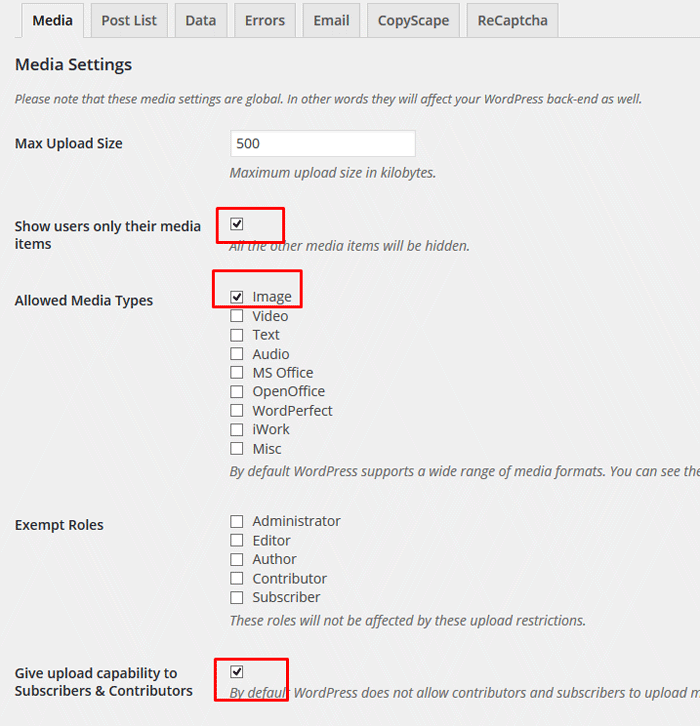
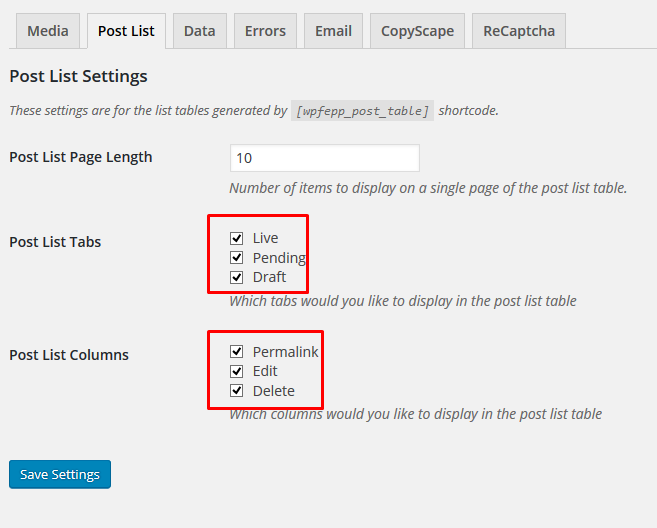
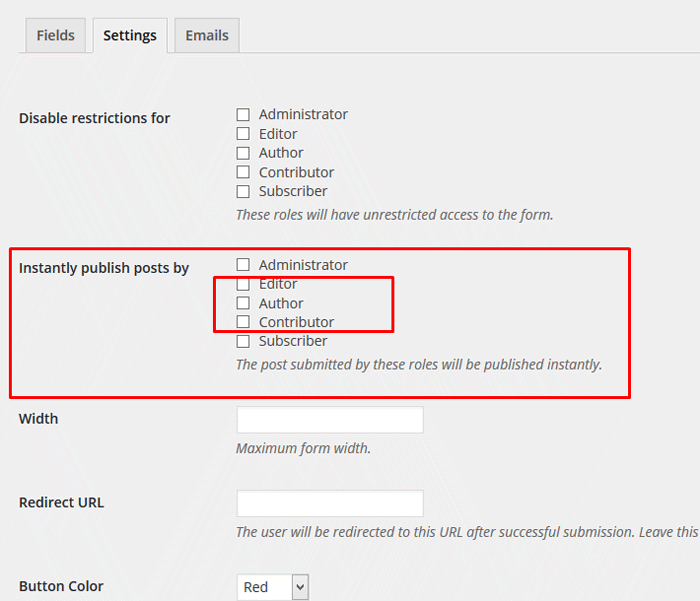
Go to Dashboard > Frontend Publishing Pro > Settings and check the options you see in the images.
By default, if you install the demo content will be checked automatically, in case there aren’t, enable/check them accordingly:
Instantly Publish Post
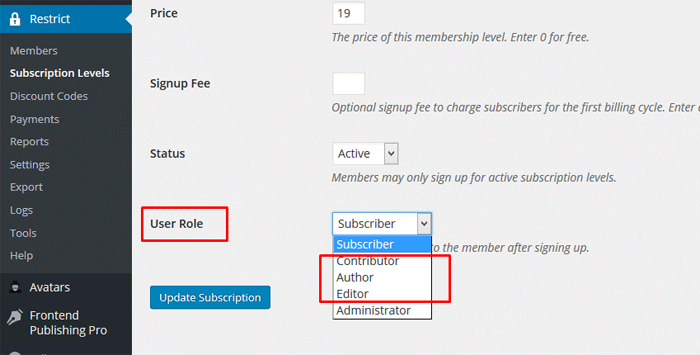
In order to make use of this option in a smart way, in order to make money, you need to have installed the optional plugin “Restrict Content Pro” and for the Subscription Level “Premium” add these settings:
- Go to Restrict ( Restrict Content Pro ) > Subscription Levels and edit the “Premium” subscription and at the bottom of the page you’ll find the “User Role” option and choose “Contributor”, “Author” or “Editor”, up to you:
- Now go to Frontend Publishing Pro and edit the “Premium” form and from the settings check the “User Role” you’ve chosen in the restrict ( Restrict Content Pro ) settings:
Using Frontend Publishing Pro without the demo content from the demo
In this section, you will learn how to install the plugin and create a simple frontend publishing form with it. Just follow these steps:
- Go to Plugins > Add New in your WordPress site’s admin panel and click on the Upload link at the top of the screen.
- Upload the plugin’s zip file. Once the file has been uploaded, activate the plugin.
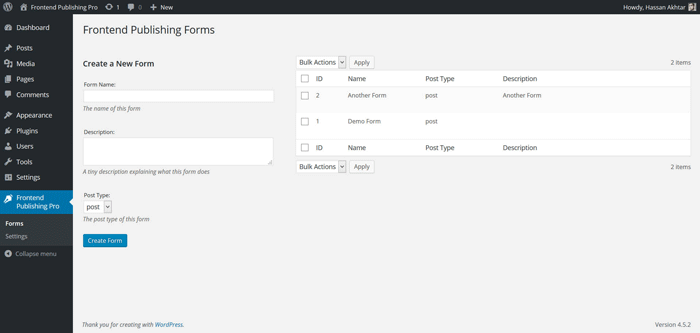
- Access the plugin control panel located at Frontend Publishing Pro > Forms.
- To create a new form just enter a suitable name, description and post type and click ‘Create Form’. After a few seconds the newly created form should show up on the right side of the screen.
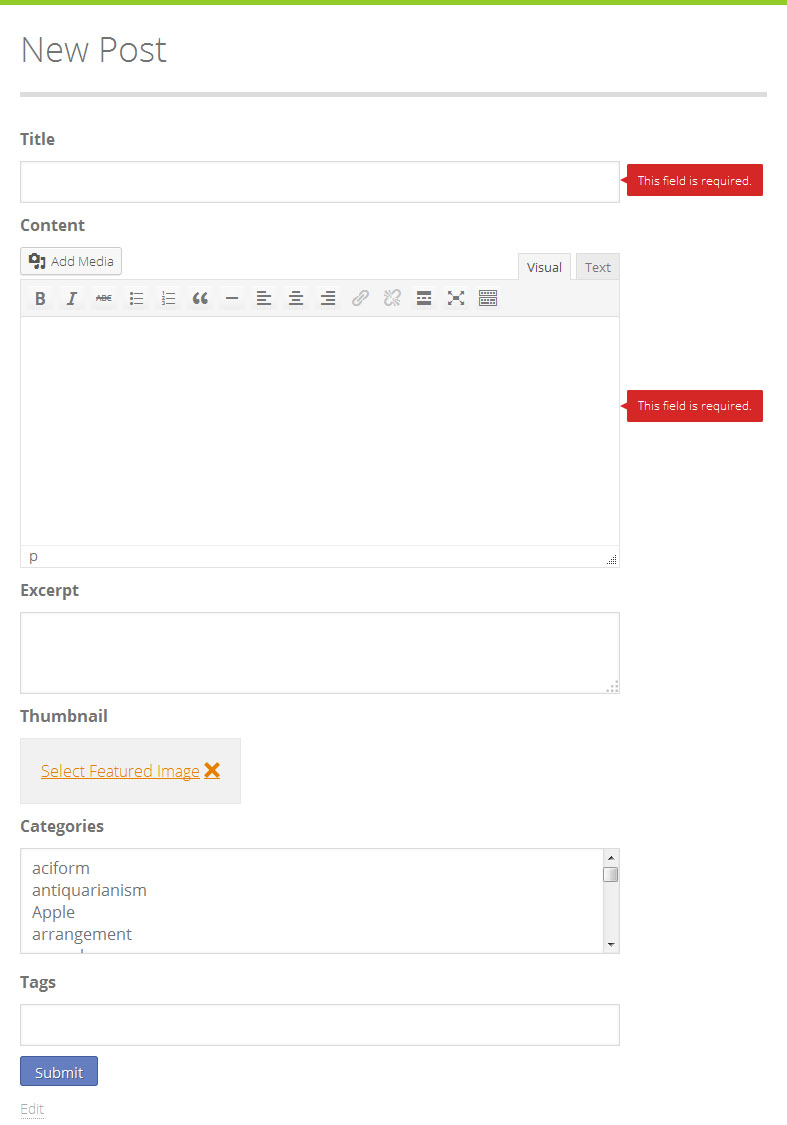
- The form is now ready for use and can be integrated into any post or page. Just create a new page and add [wpfepp_submission_form form=”X”] in the content area. Replace X with the form ID. The form should look something like this:
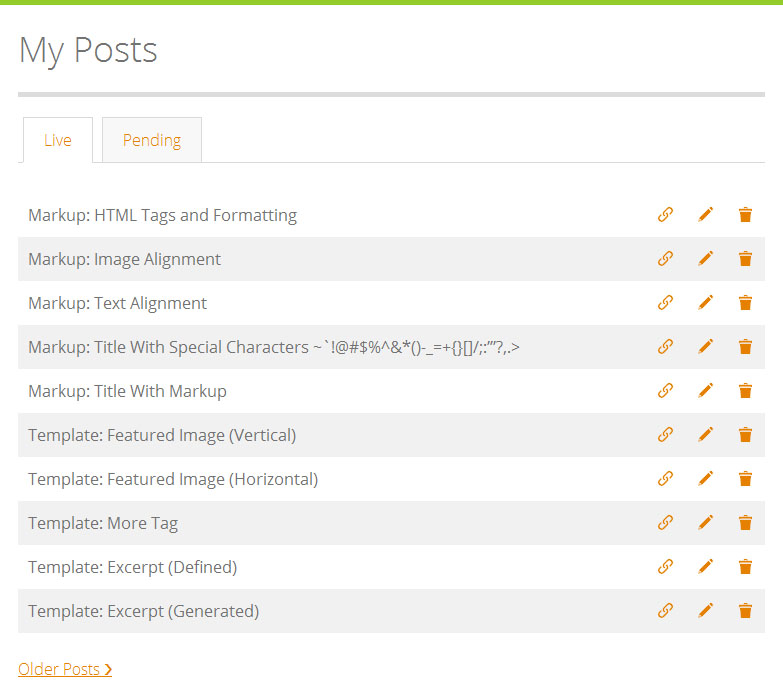
- On a different page use the shortcode [wpfepp_post_table form=”X”]. This shortcode will create a list of posts with edit and delete links. The list will contain all the posts of the post type supported by form X. It should look something like this:
Customizing A Form
If you want to customize an existing form then here are the basic steps that you need to follow:
- Go to Frontend Publishing Pro > Forms.
- In the list table located at the right side of the screen you will see all your existing forms. Hovering over a form name should make the ‘Edit’ link visible. Click on this link to start modifying the appearance and behavior of the form.
- On the next screen you will see a list of form fields. You can drag and drop these fields to rearrange them or click on a field to change its settings.
- Once you are fully satisfied with your form save your changes and see them in action on the frontend.
Defining Restrictions for a Field
One of the things that set Frontend Publishing Pro apart from the multitude of form plugins available on the Internet is that it allows you to define restrictions such as word range, maximum links, number of comma-separated sections and so on. A post is not created until all the requirements are met. To define restrictions for a particular form field:
- Go to Frontend Publishing Pro > Forms and start editing the form for which you want to define restrictions.
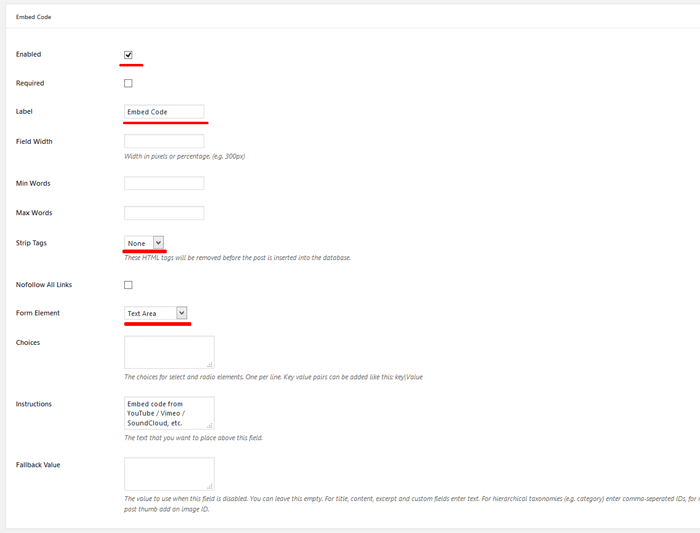
- On the next screen click on any field to slide open its settings. In this case, we will use the Content field as an example. This is what it looks like on the settings page:
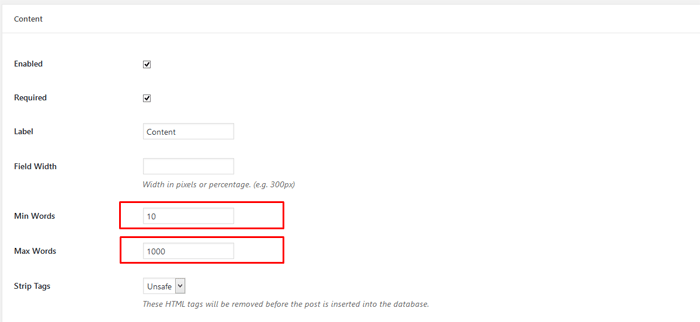
Now you can drag and drop validators and sanitizers onto this field to add restrictions. For instance, you could add the Min Words validator to the field and the user will not be able to create a post until it meets the word requirement. If you do not want to define a particular restriction just leave it empty or remove it. For instance, if you don’t want to set a maximum word count limit then just leave the area empty.
Working with Custom Fields
If you want to save a user-entered value as post meta then you should create a custom field. Here’s how you can do so:
- Go to Frontend Publishing Pro > Forms and start editing the form for which you want to create a custom field.
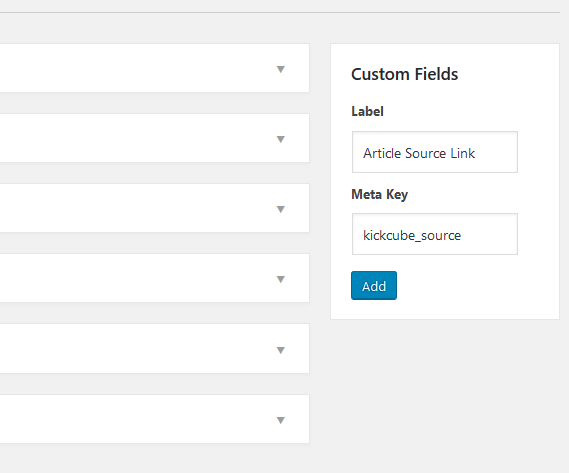
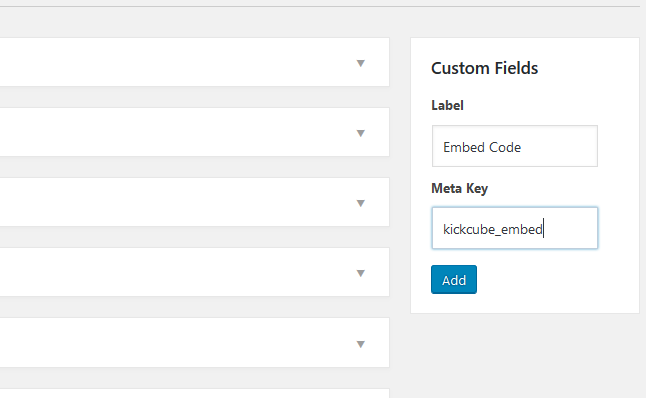
- On the right side of the page you will notice a box titled ‘Custom Fields’. Its looks like this:
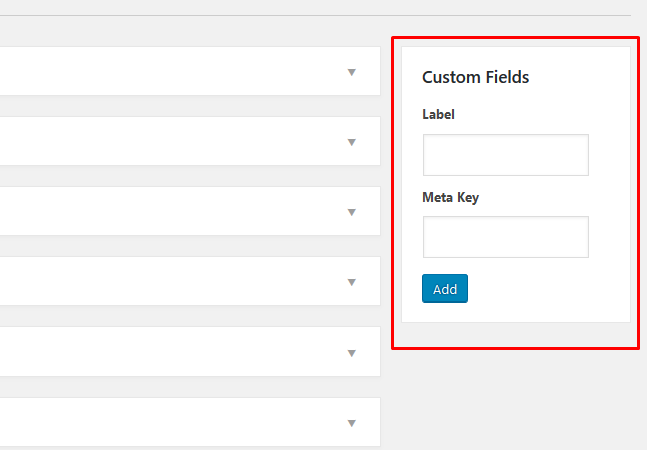
Enter a label along with a valid meta key and hit the Add button. Your new custom field will show up under the default form fields. Let’s say you want to give your users the ability to submit a byline along with each post. All you have to do is create a custom field by entering a label and a valid meta key like ‘byline’ or ‘about_the_author’. After that you can get the byline for each post by using something like this:
<?php $byline = get_post_meta( $post_id, 'byline', true ); ?>
KICKCUBE is using 2 Custom Fields
If you haven’t installed the demo content with the 1 click demo install option, you’ll need to create manually 2 custom fields: Embed Code and Article Source Link:

Go to Frontend Publishing Pro > Forms and start editing the form for which you want to create a custom field.
- First, create the “Embed Code” for the label add “Embed Code” and for meta Key add “kickcube_embed” and click add. Note: You can change the label name, but you can change the meta key.
- Second, create the “Article Source Link” for the label add “Article Source Link” and for meta Key add “kickcube_source” and click add. Note: You can change the label name, but you can change the meta key.